Uploading
a video is a simple case of making sure that you have a video of the correct file-size
and format available on your computer. Preparing or editing your video can take
a little more work!
You will also need to ensure that you have a valid
and working Upload Code - [if not, apply
here]
Your Video Size:
"Size"
can often refer to two things, either the dimensions of your video (usually in
pixels), or the amount of memory it requires (usually be shown in kb). For our
purposes, Video Size will refer to the screen size (or dimensions)
of your movie and File Size to its physical memory requirements.
The
Big Video Trade-Off:
The first thing to understand is that the Internet
was NEVER designed with videos in mind (nor was it designed for images for that
matter), so videos are a constant struggle or trade-off between their file-size
and their quality. Raw digital video footage is simply way to big and totally
impractical for use on the Internet. A single 5-minute clip would take up gigabytes
of space and take the average viewer a good few hours to download it. So there
has to be a trade-off. If your film is too big no one will ever be
able to download it - too small and no one will want to watch it!
There
are a 1001 technologies, codecs and programs claiming to be able to compress your
video to a good size whilst still maintaining a high quality, but results vary
and each have their problems.
• The section on Editing
Videos shows home-users how to easily achieve a good compromise.
Windows
Media Video - WMV files:
In order to find
a middle-ground and use a video format that 99.9% of viewers can
watch, it has been necessary to restrict video uploads to one particular file
format. This chosen format is WMV files. Now I don't for a second claim
that Windows is any better than the other formats, but it is the least troublesome
and by far the most popular format. So it is henceforth the format we will
all use!
IMPORTANT NOTE: To convert
your videos to WMV files, see Editing Videos for more
details.
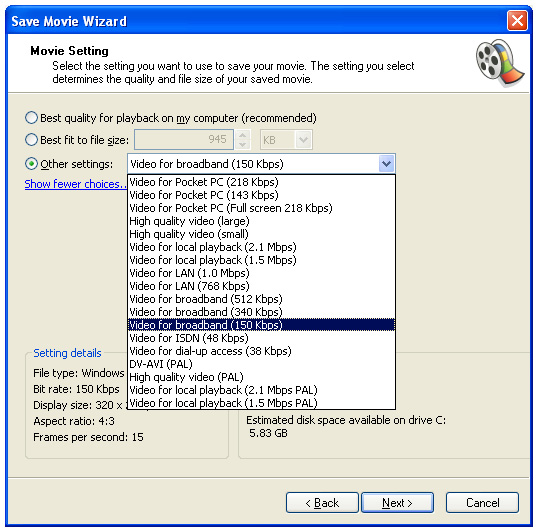
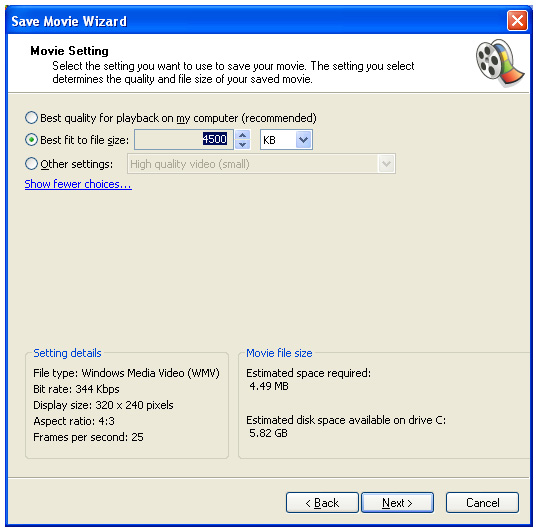
 File Size: In order to give everyone
the chance to upload, ALL video files are restricted to a maximum file
size of 5000kb (5Mb). Admittedly this is not a lot of space for motion video material,
so you will need to plan your video uploads carefully! - If your final video-file
is larger than 5Mb the upload will not be permitted. ( ... See Editing
Videos for help and tips.)
File Size: In order to give everyone
the chance to upload, ALL video files are restricted to a maximum file
size of 5000kb (5Mb). Admittedly this is not a lot of space for motion video material,
so you will need to plan your video uploads carefully! - If your final video-file
is larger than 5Mb the upload will not be permitted. ( ... See Editing
Videos for help and tips.)
Video Size: The screen-size of your
video plays a huge part in the final file-size of your upload. Quite simply
the bigger the visible screen image, the bigger your file. It is important to
note that if you double the screen-size, you actually quadruple its file-size!!
(The same applies in reverse if you shrink the screen-size.) Forget all about
trying to achieve full-screen videos! This is a sore-point amongst computer
viewers anyway, as most don't understand that videos are made for TV and not for
computers. What your computer considers to be full-screen varies greatly
depending on your monitor settings. An interesting fact is that a true full screen-movie
that plays edge-to-edge on any standard 32-inch TV set will frequently only appear
to play as half-screen on your computer!!
The best way to watch movies
full-screen is to install a TV card and playback videos to a TV set.
•
A good safe screen-size to aim for is around 320x240
pixels.
Please keep as close as possible to the recommended
screen-size above. This will make viewing your home-made movie-clips much more
enjoyable for those who wish to see what you've offered.
File Format: When selecting a video
for upload, it is important to refer back to the paragraph above on Windows
Media Videos - WMV files.
Although
there are a huge number of video file extensions available on the market, unfortunately
nearly all of them require some special software, codecs, to decompress
and read their video data! For this reason all video uploads are restricted
to the most universally accepted format: .wmv
If
your video-file is not a .wmv format
(or you've changed its name and incorrectly labelled it), it will not be possible
for you to upload your movie. ( ... See Editing Videos )
Editing Videos: Video editing can seem
to be quite a tricky and complicated affair if you are not familiar with it. There
are hundreds of different video editing programs available, (many free to download
from the net), but picking the right-one is not always that easy. If you
are experienced and have a favorite, that's fine, just as long as it can produce
the required WMV file format!
For the
rest of us, this next section will help you to work with Windows Movie
Maker, one of the most basic (easy-to-use) editing packages - and better
still, it's pre-installed on most Windows computers! The guide below is
in simple steps and (although lengthy) it's in plain English!
Windows
Movie Maker:
Okay, so some professionals
will laugh whilst others may roll-over in their graves, but the fact is that Windows
Movie Maker is a straight-up easy-to-use program. It is perfect for beginners
and has plenty of great features and special effects. Moreover it's free, fun
and it gets results!
... If you're not a beginner, please feel free
to use whatever software you get along with best!
Needless to say that
the Windows Movie Maker will only help if you run a PC with a Windows operating
system. (If you use Apple or Linux, check the web for alternate editing software).
So,
if like most of the world you're using Windows XP or something higher, you almost
certainly have Windows Movie Maker (WMM) as a built-in part of your system. (If
not check the Windows website to see if you can download a free version). If you've
never used it before, WMM can be launched by clicking your task-bar's Start
button, scrolling up to Programs and then across to Accessories.
The panel being displayed should offer you option to launch WMM program.
 WMM
offers a very simple step-by-step menu covering all the things you need to do
to capture, edit and save your movie. WMM
offers a very simple step-by-step menu covering all the things you need to do
to capture, edit and save your movie.
Full instructions and additional help
can be obtained through the built-in help menu and tutorials provided by Windows.
Needless to say it will not take you long to get the hang-of-it once you start
to practice. There is also a great range of special effects, fades and titling
options, but these should be used sparingly. It is too easy to get carried away
with your new Hollywood creativity, but the bottomline is that most people just
want to watch the film!
If you already have your movie on your computer,
the WMM will allow you to import from a large number of other movie formats.
Timeline: The WMM gives you a timeline in which to view and edit your
movie. It is important to remember that you ONLY have 5Mb for your
creation, so please don't expect you film to run for more than a few minutes!!
(A typical upload will run for 2-minutes and 30-seconds). At the end of the day
you are only uploading a movie clip - not a full film - so just pick a couple
of minutes of the best parts!! Should you have film with several good scenes,
then you can always upload them as two or three separate movies.
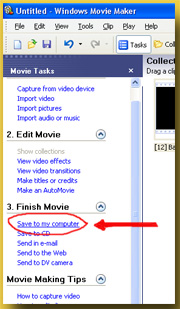
Saving
Your Film: Once edited, you will need to save it to your computer's harddrive,
ready for upload. To do this, simply select "Save to
my computer" as marked in the above diagram in red. This will then
open the Save Movie Wizard and ask you to name your movie. Call it whatever
you like (mycpmovie1 will do just fine). Your movie will automatically
be given a wmv extention!
• The next
box is the most important ....
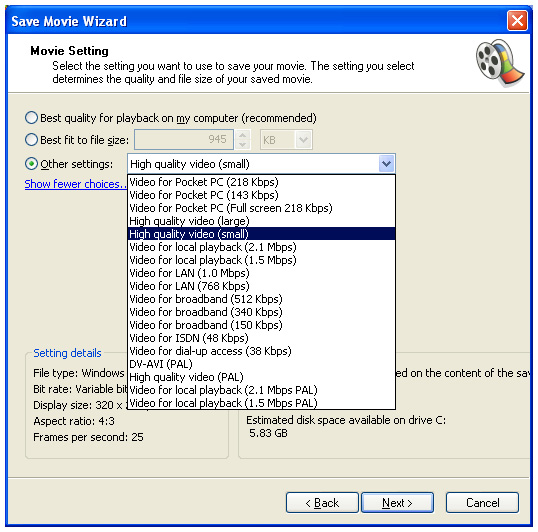
Your Video Properties: Once you've
given your movie a name, you will be presented with a number of options on how
you wish to save it (as per the diagrams below). The options here allow you to
increase or decrease the file-size of your movie upload. There are only really
three options in the drop-down list that you need to be concerned about: |